AVerMedia Game Capture HD Review
- Updated: 17th Jan, 2013
Let’s Play videos, gaming streams and games videos in general are extremely popular right now. TotalBiscuit has almost a million subscribers while Yogscast… well, Yogscast are a law unto themselves.
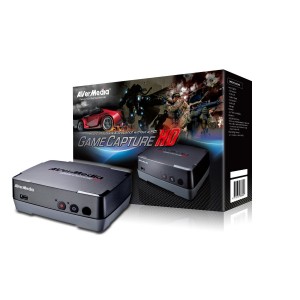
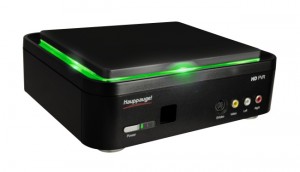
I do the occasional bit of streaming myself over on Twitch TV and post videos on YouTube now and then but without capture equipment for my console, the games I have are extremely limited. Enter Hauppage and AVerMedia, two companies that provide capture boxes for current consoles. I tried out the Hauppage HD PVR Gaming Edition and the AVerMedia Game Capture HD.Both boxes are squat black things, slightly more cubey and a bit taller than a Wii lying flat. Both come with a universal component cable that connects from your Xbox 360, PS3 or Wii to the capture box and an output component cable for your TV or home cinema/amplifier system. The key difference is that the AVerMedia box stands alone, capable of recording directly onto an internal laptop hard-drive (not included), USB stick, or external USB hard drive. The Hauppage, in contrast, requires a PC and the bundled software. This means that you won’t be able to stream with the AVerMedia box, though streaming isn’t officially supported by Hauppage anyway and must be done using third-party screen capture software like XSplit Broadcaster.
The other key difference between the two is that the Hauppage is balls. Or, at least, mine was.
I’ve tried to use it several times and each time, it simply stopped recording a few minutes in. The video pass-through worked fine to the TV, the laptop detected the device but after a couple of minutes the software simply refused to acknowledge any video input no matter how carefully I checked the cables and settings.Their support line gave me the standard advice of uninstalling devices and software but it hasn’t helped. Bloody annoying, since I spend £160 on the thing. Then they released the HDMI version a month later :\ I may give it another go but since I’ve lost my software disc anyway (another inconvenience), that might be a while. We shall not speak of it again.
The AVerMedia box, on the other hand, works. And because it doesn’t need a laptop or software configuration for each device, it’s a joy to use in comparison. It comes with a small remote control that allows you to access the overlay menu at any time during your game. Hit the screenshot button for stills and a camera icon pops up to show that the picture has been taken. Hit the video button and it shows a record icon with timer that fades out for unobtrusive recording. It does pop up with a black screen from time to time, which can be frustrating if it happens at the wrong moment but in general, you can hit record and forget about it for hours.
Here’s a demo video from Mass Effect 3 Omega. Minor spoilers, obviously, but I’ve made sure not to reveal any plot points.
If you want more, I also used the AVerMedia box to capture the footage in the infamous Dante Penis video earlier this week.
You can record up to 1080i but I got clearer results switching down to 720p. This can be hassle if, like me, you normally use a HDMI cable and full 1080p output since you have to change the settings on your Xbox 360 or PS3 before switching over the cables, but the same can be said for any non-HDMI capture equipment right now.
I did get quite a bit of ghosting in the menus on all settings, despite trying a few cables. Maybe it’s just my TV. This wasn’t noticable in gameplay but I’ll leave you to decide for yourself from the samples above.
The one thing that may be problematic is the sound. When passing the RCA sound through to my amplifier system, I heard a significant delay during gameplay – maybe only half a second but enough to be noticeably out of sync. This was solved by connecting the optical out from the supplied Xbox 360 cable directly into the amp, but bear in mind that this will disable the sound going into the capture box.
I’ve also occasionally had it stop recording or refuse to record when using an USB stick, giving a message that the drive is too slow. I’ve not yet figured out what causes this since pressing the record button again allows me to record perfectly well for longer periods of time. This hasn’t happened with a laptop drive.
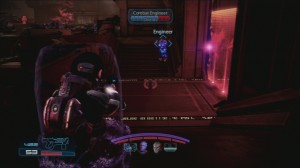
Screenshots were a little disappointing, with most shots looking a little washed out. Here are some scenes from the same section of Mass Effect 3 Omega for comparison.
This is, however, easily fixed with some basic contrast correction.
The menu system is a lovely addition that allows you to browse video and view screenshots on the fly. It’s perfect for checking that you captured what you intended, seeing as there is a slight delay between pressing the screenshot button and taking the actual picture – in real world terms I’d say it’s faster than taking a photo on a typical cameraphone. You can also change settings, e.g. to maximise space by dropping the video quality or even switch off the monitoring completely if you’re not planning to record for a while. It’s entirely compatible with a Windows filing system so you can just set up a dedicated folder on a hard drive that you already use and not worry about it wiping the rest of your data.
The AVerMedia Game Capture HD is perfect for taking videos that you plan to use as-is or edit later. If you’re looking to record live commentary, you’ll have to find a separate VO recording solution to use with it. Sadly, this box isn’t suitable for streaming.
The AVerMedia Game Capture HD is available now.


7 Comments